Baseball Summer Training Guide 2013

STACK’s Baseball Summer Training Guide was created by Kevin Barr, strength and conditioning coordinator for the Tampa Bay Rays, trainer of 2012 Cy Young Award winner David Price and Silver Slugger Evan Longoria, and founder of The Baseball Resource (TheBBR.com).

Training Tips
I’ve been training Major League Baseball players for 20 years. It’s a myth that these guys spend an hour in the weight room every day during the season.
The reality is they’re in the gym for 15 or 20 minutes two or three days a week. They knock out a total-body lift during those sessions.
The bulk of their pre-game activity is dedicated to skill work and development.
The travel baseball schedule can be crazy considering the number of games being played during the season. That’s why my program can be completed two or three days a week on non-consecutive weekdays. You can build it around your baseball schedule.
It’s a progressive program that will work for anyone who is new to training or currently in-season. It’s also good for a player coming off an injury.
Five minutes of dynamic movement will help you break a sweat. You want to warm up and train with your feet on the ground because that is how the game is played.
Stay away from static stretches.
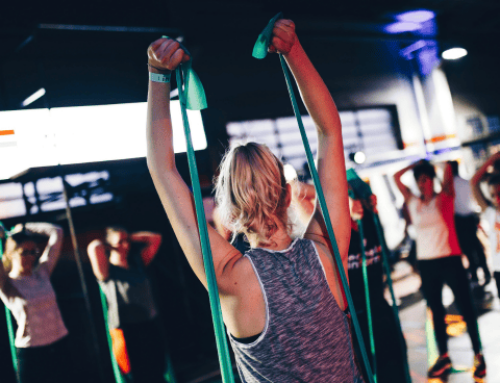
Tubing is a good training tool because it’s convenient. You can keep it in your baseball bag, wrap it around the dugout pole or the door handle in your hotel room, and get your upper-body and core rotation work done.
The yellow and red tubing is light and medium resistance, which would be good for beginner athletes new to training. They can also be used to perform rotator cuff exercises. For the basic movements for the core and the upper-body pushes and pulls, the blue and black tubing (heavy and extra heavy) work perfectly.
The bodyweight exercises for the lower body can be done on the stadium steps or on the bench in the dugout.
Shoulder stability is the foundation for maintaining and caring for your throwing arm.
Most Big League position players work out in the afternoon. Before a 7 p.m. game, the majority of the position guys will be lifting between 2 and 4 p.m.
Pitchers need to complete their upper-body work after they throw. The relief pitchers, however, will lift with the position players, because they’re not throwing until later in the evening.
In a perfect world for pitchers, they do the workout right after they pitch. If their schedule prevents them from doing that, the workout is still doable as long as they have four or five hours to rest before they play.
Don’t overthink this stuff. Your body can only move in so many ways.
You want to keep the workouts simple, but also have enough variety where you don’t feel like you’re doing the same routine over and over. If you keep incorporating those basic movements in your training program, it’s going to improve your baseball skills and help keep your body where it needs to be to handle the long season.
The First Week
Day One
- Both-Arm Tubing Chest Press (2×12)
- Single-Arm Tubing Pull – Level (2×12)
- Standing Alternating Tubing Arm-Curl and Overhead Press (2×12)
- Bodyweight Squat (2×15)
- Bodyweight Alternating Lunge (2×12 Each Side)
- Bodyweight Step-Up (2×12 each side)
- Tubing Trunk Rotation – Level (2×12)
- Tubing Trunk Rotation – High to Low (2×12)
- Tubing Trunk Rotation – Low to High (2×12)
Day Two
- Alternating-Arm Tubing Chest Press (2×12)
- Single-Arm Tubing Pull w/Rotation – High to Low (2×12)
- Standing Single-Arm Tubing Curl and Overhead Press (2×12)
- Bodyweight Split Squat (2×15)
- Bodyweight Alternating Lateral Lunge (2×12 Each Side)
- Bodyweight Lateral Step-Up (2×12 Each Side)
- Tubing Trunk Rotation – Level (2×12)
- Tubing Trunk Rotation – High to Low (2×12)
- Tubing Trunk Rotation – Low to High (2×12)
Day Three
- Both-Arm Tubing Curl and Overhead Press (2×12)
- Single-Arm Tubing Pull w/Rotation – Low to High (2×12)
- Standing Alternating Tubing Arm-Curl and Overhead Press (2×12)
- Bodyweight Squat (2×15)
- Bodyweight Walking Lunge (2×12 Each Side)
- Bodyweight Step-Up (2×12 Each Side)
- Tubing Trunk Rotation – Level (2×12)
- Tubing Trunk Rotation – High to Low (2×12)
- Tubing Trunk Rotation – Low to High (2×12)
Exercise Instructions
Alternating-Arm Tubing Chest Press
Similar to above, but perform in an alternating fashion.
Both-Arm Tubing-Curl & Overhead Press
Single-Arm Tubing Pull
Attach a tube to a stationary object at chest height. Stand with the attachment point in front with your feet slight wider than hip width and knees slightly bent. Hold the tube with one hand in front of your chest. Pull your hand to your armpit to perform a Single-Arm Row. Slowly extend your arm to return to the starting position.
Single-Arm Tubing Pull w/ Rotation (High-to-Low)
Attach a tube to a stationary object at chin height. Stand with the attachment point in front with your feet slight wider than hip width and knees slightly bent. Hold the tube with one hand in front and just above your opposite shoulder. Pull the tube down and across your body to your opposite hip. Slowly extend your arm to return to the starting position.
Single-Arm Tubing Pull w/Rotation (Low-to-High)
Attach a tube to a stationary object at hip height. Stand with the attachment point in front with your feet slight wider than hip width and knees slightly bent. Hold the tube with one hand in front of your opposite hip. Pull the tube up and across your body to your opposite shoulder. Slowly extend your arm to return to the starting position.
Standing / Alternating-Arm Tubing-Curl & Overhead Press
Similar to Both-Arm Tubing-Curl & Overhead Press, but perform in an alternating fashion.
Standing / Single-Arm Tubing-Curl & Overhead Press
Similar to Both-Arm Tubing-Curl & Overhead Press, but perform with one arm at a time.
Bodyweight Squat
Bodyweight Split-Squat
Bodyweight Alternating Lunge
Bodyweight Alternating Lateral Lunge
Bodyweight Walking Lunge
Bodyweight Step-Up
Bodyweight Lateral Step-up
Tubing / Trunk Rotation (level)
Attach a tube to a stationary object at chest height. Stand next to the attachment point with your feet slight wider than hip width and knees slightly bent. Hold the tube with your arms extended in front of your chest. Rotate your torso from side to side as far as your range of motion allows.
Tubing / Trunk Rotation (High-to-Low)
Attach a tube to a stationary object at shoulder height. Stand next to the attachment point with your feet slight wider than hip width and knees slightly bent. Hold the tube in front of your shoulder with your arms extended. Rotate your torso and pull the tube down and across your body to your opposite hip. Perform in reverse to return to the starting position.
Tubing / Trunk Rotation (Low-to-High)
Attach a tube to a stationary object at hip height. Stand next to the attachment point with your feet slight wider than hip width and knees slightly bent. Hold the tube in front of your hip with your arms extended. Rotate your torso and pull the tube up and across your body to your opposite shoulder. Perform in reverse to return to the starting position.
Photo: AP
RECOMMENDED FOR YOU


MOST POPULAR


Baseball Summer Training Guide 2013
STACK’s Baseball Summer Training Guide was created by Kevin Barr, strength and conditioning coordinator for the Tampa Bay Rays, trainer of 2012 Cy Young Award winner David Price and Silver Slugger Evan Longoria, and founder of The Baseball Resource (TheBBR.com).
Training Tips
I’ve been training Major League Baseball players for 20 years. It’s a myth that these guys spend an hour in the weight room every day during the season.
The reality is they’re in the gym for 15 or 20 minutes two or three days a week. They knock out a total-body lift during those sessions.
The bulk of their pre-game activity is dedicated to skill work and development.
The travel baseball schedule can be crazy considering the number of games being played during the season. That’s why my program can be completed two or three days a week on non-consecutive weekdays. You can build it around your baseball schedule.
It’s a progressive program that will work for anyone who is new to training or currently in-season. It’s also good for a player coming off an injury.
Five minutes of dynamic movement will help you break a sweat. You want to warm up and train with your feet on the ground because that is how the game is played.
Stay away from static stretches.
Tubing is a good training tool because it’s convenient. You can keep it in your baseball bag, wrap it around the dugout pole or the door handle in your hotel room, and get your upper-body and core rotation work done.
The yellow and red tubing is light and medium resistance, which would be good for beginner athletes new to training. They can also be used to perform rotator cuff exercises. For the basic movements for the core and the upper-body pushes and pulls, the blue and black tubing (heavy and extra heavy) work perfectly.
The bodyweight exercises for the lower body can be done on the stadium steps or on the bench in the dugout.
Shoulder stability is the foundation for maintaining and caring for your throwing arm.
Most Big League position players work out in the afternoon. Before a 7 p.m. game, the majority of the position guys will be lifting between 2 and 4 p.m.
Pitchers need to complete their upper-body work after they throw. The relief pitchers, however, will lift with the position players, because they’re not throwing until later in the evening.
In a perfect world for pitchers, they do the workout right after they pitch. If their schedule prevents them from doing that, the workout is still doable as long as they have four or five hours to rest before they play.
Don’t overthink this stuff. Your body can only move in so many ways.
You want to keep the workouts simple, but also have enough variety where you don’t feel like you’re doing the same routine over and over. If you keep incorporating those basic movements in your training program, it’s going to improve your baseball skills and help keep your body where it needs to be to handle the long season.
The First Week
Day One
- Both-Arm Tubing Chest Press (2×12)
- Single-Arm Tubing Pull – Level (2×12)
- Standing Alternating Tubing Arm-Curl and Overhead Press (2×12)
- Bodyweight Squat (2×15)
- Bodyweight Alternating Lunge (2×12 Each Side)
- Bodyweight Step-Up (2×12 each side)
- Tubing Trunk Rotation – Level (2×12)
- Tubing Trunk Rotation – High to Low (2×12)
- Tubing Trunk Rotation – Low to High (2×12)
Day Two
- Alternating-Arm Tubing Chest Press (2×12)
- Single-Arm Tubing Pull w/Rotation – High to Low (2×12)
- Standing Single-Arm Tubing Curl and Overhead Press (2×12)
- Bodyweight Split Squat (2×15)
- Bodyweight Alternating Lateral Lunge (2×12 Each Side)
- Bodyweight Lateral Step-Up (2×12 Each Side)
- Tubing Trunk Rotation – Level (2×12)
- Tubing Trunk Rotation – High to Low (2×12)
- Tubing Trunk Rotation – Low to High (2×12)
Day Three
- Both-Arm Tubing Curl and Overhead Press (2×12)
- Single-Arm Tubing Pull w/Rotation – Low to High (2×12)
- Standing Alternating Tubing Arm-Curl and Overhead Press (2×12)
- Bodyweight Squat (2×15)
- Bodyweight Walking Lunge (2×12 Each Side)
- Bodyweight Step-Up (2×12 Each Side)
- Tubing Trunk Rotation – Level (2×12)
- Tubing Trunk Rotation – High to Low (2×12)
- Tubing Trunk Rotation – Low to High (2×12)
Exercise Instructions
Alternating-Arm Tubing Chest Press
Similar to above, but perform in an alternating fashion.
Both-Arm Tubing-Curl & Overhead Press
Single-Arm Tubing Pull
Attach a tube to a stationary object at chest height. Stand with the attachment point in front with your feet slight wider than hip width and knees slightly bent. Hold the tube with one hand in front of your chest. Pull your hand to your armpit to perform a Single-Arm Row. Slowly extend your arm to return to the starting position.
Single-Arm Tubing Pull w/ Rotation (High-to-Low)
Attach a tube to a stationary object at chin height. Stand with the attachment point in front with your feet slight wider than hip width and knees slightly bent. Hold the tube with one hand in front and just above your opposite shoulder. Pull the tube down and across your body to your opposite hip. Slowly extend your arm to return to the starting position.
Single-Arm Tubing Pull w/Rotation (Low-to-High)
Attach a tube to a stationary object at hip height. Stand with the attachment point in front with your feet slight wider than hip width and knees slightly bent. Hold the tube with one hand in front of your opposite hip. Pull the tube up and across your body to your opposite shoulder. Slowly extend your arm to return to the starting position.
Standing / Alternating-Arm Tubing-Curl & Overhead Press
Similar to Both-Arm Tubing-Curl & Overhead Press, but perform in an alternating fashion.
Standing / Single-Arm Tubing-Curl & Overhead Press
Similar to Both-Arm Tubing-Curl & Overhead Press, but perform with one arm at a time.
Bodyweight Squat
Bodyweight Split-Squat
Bodyweight Alternating Lunge
Bodyweight Alternating Lateral Lunge
Bodyweight Walking Lunge
Bodyweight Step-Up
Bodyweight Lateral Step-up
Tubing / Trunk Rotation (level)
Attach a tube to a stationary object at chest height. Stand next to the attachment point with your feet slight wider than hip width and knees slightly bent. Hold the tube with your arms extended in front of your chest. Rotate your torso from side to side as far as your range of motion allows.
Tubing / Trunk Rotation (High-to-Low)
Attach a tube to a stationary object at shoulder height. Stand next to the attachment point with your feet slight wider than hip width and knees slightly bent. Hold the tube in front of your shoulder with your arms extended. Rotate your torso and pull the tube down and across your body to your opposite hip. Perform in reverse to return to the starting position.
Tubing / Trunk Rotation (Low-to-High)
Attach a tube to a stationary object at hip height. Stand next to the attachment point with your feet slight wider than hip width and knees slightly bent. Hold the tube in front of your hip with your arms extended. Rotate your torso and pull the tube up and across your body to your opposite shoulder. Perform in reverse to return to the starting position.
Photo: AP