The One Bodyweight Movement That Can Reveal a Thousand Flaws
The initial assessment of a client or athlete can be one of the most valuable tools for a strength coach.
Baseline assessments provide an initial opportunity to understand the way the athlete moves and the location and extent of their limitations and imbalances. A good assessment helps a coach create a program best suited for the needs of the individual.
However, most assessments are time consuming, and in a group setting, a strength and conditioning coach may only have so much time to assess their athlete. The Functional Movement Screen (FMS) is considered the gold standard for movement assessments, but its greatest limitation is that it takes a considerable amount of time to administer. It’s estimated that it takes about 8 minutes per participant. That might not sound so bad, but if you have a group of 30 clients, that translates to at least four hours solely dedicated to assessments. That is not practical or realistic. However, I believe there is one movement from the FMS that every coach should utilize. It’s the Overhead Deep Squat.
At a glance, the test looks simple enough. Press an unweighted dowel overhead, get down into a deep squat, and come up out of it. But for the modern human, the Overhead Deep Squat can be exceedingly difficult. Our modern lifestyles and training habits have created numerous imbalances and/or limitations that can throw your Overhead Deep Squat out of whack. The Titleist Performance Institute has stated that only 29% of the amateur golfers they test in this movement are able to pass.
A trained eye can glean a ton of information about an athlete or client simply by watching them Overhead Deep Squat. The move can be limited by mobility in the ankle, hip, T-spine and shoulders, and it can also be hindered by a lack of coordination, balance, stability and muscular activation. Although one movement can never tell the whole story of an athlete, the Overhead Deep Squat gives the coach a tremendous amount of feedback to follow up on.
This assessment is also very easy to administer. If you have a dowel or a PVC pipe and a 2×4, you can administer this assessment. It only takes about 30 seconds per athlete to administer, which allows you to pound out an entire team in 10-15 minutes. Here’s how to properly administer and analyze this revealing assessment.
How to Administer the Overhead Deep Squat
First, provide a visual demonstration of the movement for the athlete prior to having them perform the exercise.
Here’s the basic procedure:
- Feet set at or just slightly wider than shoulder-width
- Ankles underneath armpits
- Feet should be within 12 degrees of pointing straight ahead
- Dowel on top of the head with your elbow at a 90-degree angle
- Push the dowel above the head to lock out the arms.
- Squat down as far as possible while striving to keep the dowel over the feet as opposed to allowing it to drift forward.
- Have the athlete perform 3 repetitions to the best of their ability.
A perfect score sees the upper torso parallel with tibia, femur below horizontal, knees aligned over feet, dowel aligned over feet through the rep (see above video).
I recommend that you video record the assessment from the front and from the side. There is so much feedback you are receiving that you are likely to miss something if it is not recorded.
If the athlete cannot perform it to the perfect standard, have them put their heels on the 2×4 and perform 3 more repetitions. If an athlete can perform the exercise perfectly with no board, then they will receive a score of 3. If they perform the exercise perfectly with their heels on the board, then they will receive a 2. If they cannot perform it with their heels on the board, they will receive a score of 1. If they experience any pain during the movement, they will receive a score of 0.
Analyzing the Overhead Deep Squat
This assessment provides you with a ton of feedback about your athletes. Below are some common limitations evident in the Deep Overhead Squat. Never try to figure out exactly why the athlete has a limitation while actively assessing. Assess the movement, review the tape as needed, grade the athlete and then dive into further analysis to pinpoint the cause.
The Foot/Ankle: Make sure the athlete’s feet stay flat on the ground. Their heels may lift off the ground if they lack mobility at the ankle, their feet may slide out to allow for motion they lack at the hip, or their foot or ankle can also cave medially. Any of these three limitations needs to be taken seriously. If an athlete does not have a firm foundation to squat from, then this will cause issues throughout the entire kinetic chain.
The Knee: Valgus is the major issue that can be seen at the knee. This typically is caused by either a lack of hip external rotator activation, a limitation at the ankle or simply inexperience in the movement. The knee needs to be stable. If the joints above or below are lacking mobility, the knee will be the joint to pay for it. For more information on Ankle mobility and it’s affect on knee stability, read Why Your Ankle Mobility Sucks.
The Hip: The hip will be our best indicator of depth. If the athlete lacks flexion in the hip, they will not be able to reach the deep squat position. They can also lack mobility or activation of hip external rotators, which is typically able to be seen from the anterior view of the knees. The last thing to look for from the lateral view is if the athlete has any sort of butt wink when they get into the deep position. Butt wink occurs when the pelvis tilts posteriorly to allow the athlete to get deeper into their squat, which causes extra strain on the low back. Contrary to popular belief, this is a technique limitation and not a mobility limitation. If the athlete has been taught to keep their knees behind their toes when they squat, then they may have to butt wink to get into a deep squat position. An easy fix is to cue the athlete to sit their hips in between their ankles. This changes the path of the squat and allows the spine to stay neutral at greater depths.
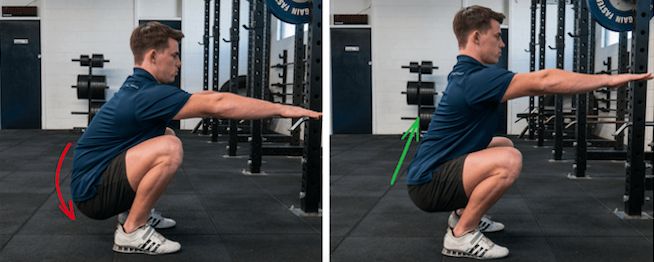
Photo Credit: Movement Enhanced
The Torso: The torso angle should stay nearly vertical in the Deep Squat. It does come forward slightly, but if what you’re seeing is beyond that, there is likely limitation at the hip, ankle or T-Spine. It is crucial to actually look at the torso and not just the dowel, because many athletes will have excessive internal rotation that allows them to keep the dowel overhead and compensate for their mobility limitations. The other obvious thing to look for is rounding at any part of the spine during the movement.
The Shoulder/Dowel: The shoulders and elbows should remain locked out for the entirety of the movement. This error is more common than you think. Young athletes have surprising trouble with fully extending their arms overhead. The arms should remain in the same vertical path for the entirety of the Squat. If the athlete brings the dowel significantly forward or backward, this is a compensation. While some internal rotation is necessary for proper shoulder function in the deep squat position, excessive internal rotation is a compensation for limitations elsewhere in the kinetic chain.
Their Balance: If the athlete cannot maintain their balance during the movement, obviously that would be a score of 1. A more subtle limitation, though, is seen in athletes favoring a dominant side. This can be seen at the hips or at the shoulder from the anterior view. While this is a bilateral assessment, you can still see imbalances unilaterally. Many athletes will shift toward their stronger side naturally during strength training. This will commonly carry over into this assessment. The biggest thing is to see if it is at the hip or at the shoulder. Do not just look at the dowel angle and assume it is the shoulders, because the same thing will occur if it is an imbalance at the hip. Look at each joint and assess if the athlete can ascend and descend without favoring a dominant side. Even if an athlete is not shifting, they can have an asymmetry. But if they are shifting this is a major imbalance somewhere in the kinetic chain.
A cheatsheet of what to look for is listed below. Remember to videotape, because you do not want to miss any of this information:
Anterior View
- Foot angle stays the same
- Arches do not cave medially
- Knees staying inline over foot (Avoid Valgus)
- Symmetry at the hip and shoulders
- Shoulders and elbows remain locked out
Lateral View
- Heels stay on the ground
- Knees fully flex
- Hips fully flex
- Lumbar spine remains neutral (avoid butt-wink)
- Torso angle remains nearly vertical
- Dowel remains overhead
Limitations of the Overhead Deep Squat
While the Overhead Deep Squat is a tremendous assessment, it cannot analyze everything.
The Overhead Deep Squat is a bilateral assessment, which means it assesses both sides of the body at the same time. This is great for efficiency, but unless there is an extreme weight shift, it is difficult to see side-to-side imbalances from this assessment.
And although the Overhead Deep Squat tells you a lot about an athlete, it doesn’t reveal exactly what they move like on a sports field. The Overhead Deep Squat tells you nothing about the actual skill or speed or agility of the athlete.
This is not the only assessment that you need, but it is one assessment that every strength and conditioning coach should do with their athletes. I believe every good assessment battery should also contain a ballistic component. A great complement to the Deep Overhead Squat would be a ballistic unilateral assessment. The desire is that this will show how the athlete moves in a sport-like action and if there is a side-to-side limitation. I recommend using a Single-Leg Hop for distance. More specifically, I prefer to utilize a Triple Hop Assessment.
This assessment is typically used for return-to-play criteria for athletes, but can be effective for assessing healthy athletes as well. To make the hop assessment effective in assessing healthy athletes, have them perform three consecutive hops on each side. Each hop should be for as much distance as possible and they should “stick” the final landing for distance and measure the total distance travelled. Also measure how far they moved medially or laterally from their starting point. Comparing the data for both sides will give you a solid indicator of the athlete’s unilateral power, balance and symmetry.
The Overhead Deep Squat is the single-best movement assessment out there. It is easy to administer and gives you a ton of feedback about your athlete or client. It would be optimal to perform the entire FMS to get a more complete profile of your athlete, but if time is tight and you can only utilize one assessment, I believe it has to be the Overhead Deep Squat. Due to postural epidemics like anterior dominance, the issues the Overhead Deep Squat can help reveal have only become more common in recent years.
The Overhead Deep Squat is not the only assessment you should utilize with your athletes, but I believe it is the one assessment everyone should be using with their athletes.
References:
Bishop, Chris. “Chapter 13/Movement Screening.” Advanced Strength and Conditioning an Evidence-Based Approach, by Anthony Turner and Paul Comfort, Routledge, 2018, pp. 205–228.
Cook, Gray. Movement: Functional Movement Systems: Screening, Assessment and Corrective Strategies. On Target Publications, 2017.
Starrett, Kelly, and Glen Cordoza. Becoming a Supple Leopard: the Ultimate Guide to Resolving Pain, Preventing Injury, and Optimizing Athletic Performance. Victory Belt Publishing, 2015.
READ MORE:
RECOMMENDED FOR YOU

MOST POPULAR


The One Bodyweight Movement That Can Reveal a Thousand Flaws
The initial assessment of a client or athlete can be one of the most valuable tools for a strength coach.
Baseline assessments provide an initial opportunity to understand the way the athlete moves and the location and extent of their limitations and imbalances. A good assessment helps a coach create a program best suited for the needs of the individual.
However, most assessments are time consuming, and in a group setting, a strength and conditioning coach may only have so much time to assess their athlete. The Functional Movement Screen (FMS) is considered the gold standard for movement assessments, but its greatest limitation is that it takes a considerable amount of time to administer. It’s estimated that it takes about 8 minutes per participant. That might not sound so bad, but if you have a group of 30 clients, that translates to at least four hours solely dedicated to assessments. That is not practical or realistic. However, I believe there is one movement from the FMS that every coach should utilize. It’s the Overhead Deep Squat.
At a glance, the test looks simple enough. Press an unweighted dowel overhead, get down into a deep squat, and come up out of it. But for the modern human, the Overhead Deep Squat can be exceedingly difficult. Our modern lifestyles and training habits have created numerous imbalances and/or limitations that can throw your Overhead Deep Squat out of whack. The Titleist Performance Institute has stated that only 29% of the amateur golfers they test in this movement are able to pass.
A trained eye can glean a ton of information about an athlete or client simply by watching them Overhead Deep Squat. The move can be limited by mobility in the ankle, hip, T-spine and shoulders, and it can also be hindered by a lack of coordination, balance, stability and muscular activation. Although one movement can never tell the whole story of an athlete, the Overhead Deep Squat gives the coach a tremendous amount of feedback to follow up on.
This assessment is also very easy to administer. If you have a dowel or a PVC pipe and a 2×4, you can administer this assessment. It only takes about 30 seconds per athlete to administer, which allows you to pound out an entire team in 10-15 minutes. Here’s how to properly administer and analyze this revealing assessment.
How to Administer the Overhead Deep Squat
First, provide a visual demonstration of the movement for the athlete prior to having them perform the exercise.
Here’s the basic procedure:
- Feet set at or just slightly wider than shoulder-width
- Ankles underneath armpits
- Feet should be within 12 degrees of pointing straight ahead
- Dowel on top of the head with your elbow at a 90-degree angle
- Push the dowel above the head to lock out the arms.
- Squat down as far as possible while striving to keep the dowel over the feet as opposed to allowing it to drift forward.
- Have the athlete perform 3 repetitions to the best of their ability.
A perfect score sees the upper torso parallel with tibia, femur below horizontal, knees aligned over feet, dowel aligned over feet through the rep (see above video).
I recommend that you video record the assessment from the front and from the side. There is so much feedback you are receiving that you are likely to miss something if it is not recorded.
If the athlete cannot perform it to the perfect standard, have them put their heels on the 2×4 and perform 3 more repetitions. If an athlete can perform the exercise perfectly with no board, then they will receive a score of 3. If they perform the exercise perfectly with their heels on the board, then they will receive a 2. If they cannot perform it with their heels on the board, they will receive a score of 1. If they experience any pain during the movement, they will receive a score of 0.
Analyzing the Overhead Deep Squat
This assessment provides you with a ton of feedback about your athletes. Below are some common limitations evident in the Deep Overhead Squat. Never try to figure out exactly why the athlete has a limitation while actively assessing. Assess the movement, review the tape as needed, grade the athlete and then dive into further analysis to pinpoint the cause.
The Foot/Ankle: Make sure the athlete’s feet stay flat on the ground. Their heels may lift off the ground if they lack mobility at the ankle, their feet may slide out to allow for motion they lack at the hip, or their foot or ankle can also cave medially. Any of these three limitations needs to be taken seriously. If an athlete does not have a firm foundation to squat from, then this will cause issues throughout the entire kinetic chain.
The Knee: Valgus is the major issue that can be seen at the knee. This typically is caused by either a lack of hip external rotator activation, a limitation at the ankle or simply inexperience in the movement. The knee needs to be stable. If the joints above or below are lacking mobility, the knee will be the joint to pay for it. For more information on Ankle mobility and it’s affect on knee stability, read Why Your Ankle Mobility Sucks.
The Hip: The hip will be our best indicator of depth. If the athlete lacks flexion in the hip, they will not be able to reach the deep squat position. They can also lack mobility or activation of hip external rotators, which is typically able to be seen from the anterior view of the knees. The last thing to look for from the lateral view is if the athlete has any sort of butt wink when they get into the deep position. Butt wink occurs when the pelvis tilts posteriorly to allow the athlete to get deeper into their squat, which causes extra strain on the low back. Contrary to popular belief, this is a technique limitation and not a mobility limitation. If the athlete has been taught to keep their knees behind their toes when they squat, then they may have to butt wink to get into a deep squat position. An easy fix is to cue the athlete to sit their hips in between their ankles. This changes the path of the squat and allows the spine to stay neutral at greater depths.
Photo Credit: Movement Enhanced
The Torso: The torso angle should stay nearly vertical in the Deep Squat. It does come forward slightly, but if what you’re seeing is beyond that, there is likely limitation at the hip, ankle or T-Spine. It is crucial to actually look at the torso and not just the dowel, because many athletes will have excessive internal rotation that allows them to keep the dowel overhead and compensate for their mobility limitations. The other obvious thing to look for is rounding at any part of the spine during the movement.
The Shoulder/Dowel: The shoulders and elbows should remain locked out for the entirety of the movement. This error is more common than you think. Young athletes have surprising trouble with fully extending their arms overhead. The arms should remain in the same vertical path for the entirety of the Squat. If the athlete brings the dowel significantly forward or backward, this is a compensation. While some internal rotation is necessary for proper shoulder function in the deep squat position, excessive internal rotation is a compensation for limitations elsewhere in the kinetic chain.
Their Balance: If the athlete cannot maintain their balance during the movement, obviously that would be a score of 1. A more subtle limitation, though, is seen in athletes favoring a dominant side. This can be seen at the hips or at the shoulder from the anterior view. While this is a bilateral assessment, you can still see imbalances unilaterally. Many athletes will shift toward their stronger side naturally during strength training. This will commonly carry over into this assessment. The biggest thing is to see if it is at the hip or at the shoulder. Do not just look at the dowel angle and assume it is the shoulders, because the same thing will occur if it is an imbalance at the hip. Look at each joint and assess if the athlete can ascend and descend without favoring a dominant side. Even if an athlete is not shifting, they can have an asymmetry. But if they are shifting this is a major imbalance somewhere in the kinetic chain.
A cheatsheet of what to look for is listed below. Remember to videotape, because you do not want to miss any of this information:
Anterior View
- Foot angle stays the same
- Arches do not cave medially
- Knees staying inline over foot (Avoid Valgus)
- Symmetry at the hip and shoulders
- Shoulders and elbows remain locked out
Lateral View
- Heels stay on the ground
- Knees fully flex
- Hips fully flex
- Lumbar spine remains neutral (avoid butt-wink)
- Torso angle remains nearly vertical
- Dowel remains overhead
Limitations of the Overhead Deep Squat
While the Overhead Deep Squat is a tremendous assessment, it cannot analyze everything.
The Overhead Deep Squat is a bilateral assessment, which means it assesses both sides of the body at the same time. This is great for efficiency, but unless there is an extreme weight shift, it is difficult to see side-to-side imbalances from this assessment.
And although the Overhead Deep Squat tells you a lot about an athlete, it doesn’t reveal exactly what they move like on a sports field. The Overhead Deep Squat tells you nothing about the actual skill or speed or agility of the athlete.
This is not the only assessment that you need, but it is one assessment that every strength and conditioning coach should do with their athletes. I believe every good assessment battery should also contain a ballistic component. A great complement to the Deep Overhead Squat would be a ballistic unilateral assessment. The desire is that this will show how the athlete moves in a sport-like action and if there is a side-to-side limitation. I recommend using a Single-Leg Hop for distance. More specifically, I prefer to utilize a Triple Hop Assessment.
This assessment is typically used for return-to-play criteria for athletes, but can be effective for assessing healthy athletes as well. To make the hop assessment effective in assessing healthy athletes, have them perform three consecutive hops on each side. Each hop should be for as much distance as possible and they should “stick” the final landing for distance and measure the total distance travelled. Also measure how far they moved medially or laterally from their starting point. Comparing the data for both sides will give you a solid indicator of the athlete’s unilateral power, balance and symmetry.
The Overhead Deep Squat is the single-best movement assessment out there. It is easy to administer and gives you a ton of feedback about your athlete or client. It would be optimal to perform the entire FMS to get a more complete profile of your athlete, but if time is tight and you can only utilize one assessment, I believe it has to be the Overhead Deep Squat. Due to postural epidemics like anterior dominance, the issues the Overhead Deep Squat can help reveal have only become more common in recent years.
The Overhead Deep Squat is not the only assessment you should utilize with your athletes, but I believe it is the one assessment everyone should be using with their athletes.
References:
Bishop, Chris. “Chapter 13/Movement Screening.” Advanced Strength and Conditioning an Evidence-Based Approach, by Anthony Turner and Paul Comfort, Routledge, 2018, pp. 205–228.
Cook, Gray. Movement: Functional Movement Systems: Screening, Assessment and Corrective Strategies. On Target Publications, 2017.
Starrett, Kelly, and Glen Cordoza. Becoming a Supple Leopard: the Ultimate Guide to Resolving Pain, Preventing Injury, and Optimizing Athletic Performance. Victory Belt Publishing, 2015.
READ MORE: