3 Foam Rolling Techniques You’re Missing In Your Recovery
Foam rolling is one of the most popular ways to relieve muscle pain and soreness. Foam rolling is a form of self-myofascial release, a self-massage meant to roll out the physical “knots” in your muscle fibers. Self-myofascial release helps increase blood flow to the muscle fibers, which helps them repair and heal, as well as increase flexibility to prevent injuries and keep the muscles limber. Although notoriously uncomfortable, foam rolling is fantastic for maintaining elasticity and decreasing delayed-onset muscle soreness (also known as DOMS), ultimately improving your recovery after exercise.
Foam rolling techniques for your back and lower body can be particularly difficult but important, as the muscles in your back and lower body are often thicker and tighter; prolonged pain in these muscles while you’re recovering from a heavy workout can be very uncomfortable, so foam rolling is a great idea for anyone who experiences muscle pain after a heavy leg or back day. Foam rolling is especially good for DOMS as it helps release the lactic acid that builds up in your muscle during intense physical exercise—something that would otherwise take up to a week to occur naturally. Because foam rolling is somewhat painful, it’s important to know proper form and how it should feel to prevent potentially injuring yourself.
While a foam roller is not necessary for self-myofascial release, it is the easiest way. If you don’t want to buy one, you can use a thick PVC pipe or a hard ball, like a baseball or softball.
Thoracic Spine
On the floor, lie with your back resting on your foam roller and your hips raised so your body is horizontal above the floor. With your hands locked behind your head for support, roll your upper back up and down over your thoracic spine, pressing firmly against the foam roller.
After you feel your back muscles beginning to give to the pressure, perform crunches in this same position, while extending your back past the foam roller, reaching the top of your head toward the floor. Repeat this movement while moving down 1 or 2 inches at a time will extend your entire back.
Finally, wrap your arms around yourself tightly and leave your upper back relaxed. Slide side to side on the foam roller as well as up and down a few inches.
Calves and Glutes
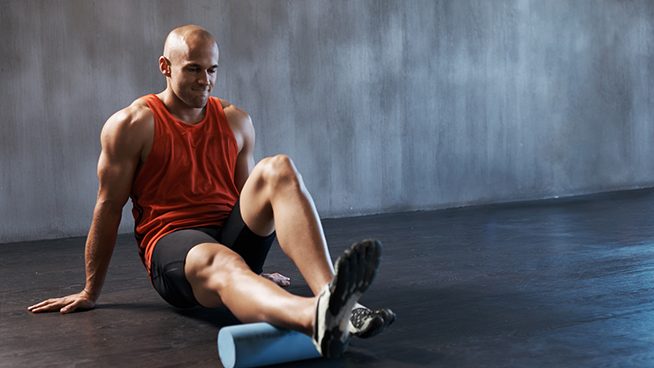
While sitting on the floor with the foam roller under your lower calf, place your other ankle over the one on the foam roller and apply pressure. Roll your calf muscle up and down several inches while applying pressure with your other foot on top of your ankle.
Repeat this motion with your calf internally rotated and then externally rotated to work the other sides of your calf. Repeat this motion for about a minute each time, then repeat for the other leg.
With your hands and feet firmly on the floor and sitting on the foam roller, lift one of your ankles and place it on the knee of your other leg, putting your weight on one of your glutes.
Roll your hips and glutes down to the top of your thigh, putting significant pressure on your glutes—this is a thick muscle that often has padding on top, so it needs significant pressure. Roll firmly but slowly back toward your lower back; repeat this several times for about two minutes. Switch your ankle to the other leg and repeat the movement on the other side, remaining firm and deliberate in your movements.
Quads
With your hands on the floor like you were preparing for a Push-Up, place your upper quad near your hip on the foam rollers; cross your other leg on top of the one on the foam roller for additional pressure. As your quad muscles are very thick, you will need a lot of pressure.
Slide slowly down toward your knee while weighing down your quad with your other leg. Stop and press deeply on any spots that feel particularly painful. Repeat this movement several times for about two minutes, moving very slowly. Repeat this movement while rotating your quad to hit the inner and outer portions of the muscle. Switch to the other leg and repeat.
Foam rolling with these instructions should help increase blood flow to the muscle fibers that you have strained and improve flexibility long-term. With these techniques you’ll be able to keep limber and pain-free, enabling you to continue enjoying your life.
READ MORE:
- Foam Rolling Techniques to Fix Every Trouble Spot on Your Body
- Don’t Foam Roll Your IT Band. Do This Instead.
- Everything That’s Wrong With Your Foam Rolling Routine
PeopleImages/iStockPhotos
RECOMMENDED FOR YOU


MOST POPULAR


3 Foam Rolling Techniques You’re Missing In Your Recovery
Foam rolling is one of the most popular ways to relieve muscle pain and soreness. Foam rolling is a form of self-myofascial release, a self-massage meant to roll out the physical “knots” in your muscle fibers. Self-myofascial release helps increase blood flow to the muscle fibers, which helps them repair and heal, as well as increase flexibility to prevent injuries and keep the muscles limber. Although notoriously uncomfortable, foam rolling is fantastic for maintaining elasticity and decreasing delayed-onset muscle soreness (also known as DOMS), ultimately improving your recovery after exercise.
Foam rolling techniques for your back and lower body can be particularly difficult but important, as the muscles in your back and lower body are often thicker and tighter; prolonged pain in these muscles while you’re recovering from a heavy workout can be very uncomfortable, so foam rolling is a great idea for anyone who experiences muscle pain after a heavy leg or back day. Foam rolling is especially good for DOMS as it helps release the lactic acid that builds up in your muscle during intense physical exercise—something that would otherwise take up to a week to occur naturally. Because foam rolling is somewhat painful, it’s important to know proper form and how it should feel to prevent potentially injuring yourself.
While a foam roller is not necessary for self-myofascial release, it is the easiest way. If you don’t want to buy one, you can use a thick PVC pipe or a hard ball, like a baseball or softball.
Thoracic Spine
On the floor, lie with your back resting on your foam roller and your hips raised so your body is horizontal above the floor. With your hands locked behind your head for support, roll your upper back up and down over your thoracic spine, pressing firmly against the foam roller.
After you feel your back muscles beginning to give to the pressure, perform crunches in this same position, while extending your back past the foam roller, reaching the top of your head toward the floor. Repeat this movement while moving down 1 or 2 inches at a time will extend your entire back.
Finally, wrap your arms around yourself tightly and leave your upper back relaxed. Slide side to side on the foam roller as well as up and down a few inches.
Calves and Glutes
While sitting on the floor with the foam roller under your lower calf, place your other ankle over the one on the foam roller and apply pressure. Roll your calf muscle up and down several inches while applying pressure with your other foot on top of your ankle.
Repeat this motion with your calf internally rotated and then externally rotated to work the other sides of your calf. Repeat this motion for about a minute each time, then repeat for the other leg.
With your hands and feet firmly on the floor and sitting on the foam roller, lift one of your ankles and place it on the knee of your other leg, putting your weight on one of your glutes.
Roll your hips and glutes down to the top of your thigh, putting significant pressure on your glutes—this is a thick muscle that often has padding on top, so it needs significant pressure. Roll firmly but slowly back toward your lower back; repeat this several times for about two minutes. Switch your ankle to the other leg and repeat the movement on the other side, remaining firm and deliberate in your movements.
Quads
With your hands on the floor like you were preparing for a Push-Up, place your upper quad near your hip on the foam rollers; cross your other leg on top of the one on the foam roller for additional pressure. As your quad muscles are very thick, you will need a lot of pressure.
Slide slowly down toward your knee while weighing down your quad with your other leg. Stop and press deeply on any spots that feel particularly painful. Repeat this movement several times for about two minutes, moving very slowly. Repeat this movement while rotating your quad to hit the inner and outer portions of the muscle. Switch to the other leg and repeat.
Foam rolling with these instructions should help increase blood flow to the muscle fibers that you have strained and improve flexibility long-term. With these techniques you’ll be able to keep limber and pain-free, enabling you to continue enjoying your life.
READ MORE:
- Foam Rolling Techniques to Fix Every Trouble Spot on Your Body
- Don’t Foam Roll Your IT Band. Do This Instead.
- Everything That’s Wrong With Your Foam Rolling Routine
PeopleImages/iStockPhotos