The Vertical Jump and It’s Variations
The vertical Jump is a versatile field test that can be used in a wide variety of ways to measure performance. One of the key aspects of vertical jump tests that makes them so valuable is that they are easy to perform and need only a small amount of equipment to be administered. Because of its simplicity and the need for little in the way of technique, it can be a very reliable test. The main reasons for utilizing vertical jump tests are to determine general leg power and to check for nervous system fatigue due to overtraining. However, within this simple test, there are a wide variety of variations that can be used depending on the given situation.
How to Do the Sargent Jump
The Sargent Jump, which dates back to 1921, is the most basic form of the vertical jump test. When doing this jump test with the minimal amount of equipment, the athlete will begin by reaching up as high as they can against a wall with their dominant hand and mark how high they can reach. This measurement will be noted and used later on with the athlete’s “touch” measurement, which will be generated with the actual jump test. It is very important that the athlete reaches full extension doing the measurement and does this every time they are measured so the results will be consistent. This measurement can be the biggest source of error in the test if not done properly or consistently.
To begin the Sargent Jump, the athlete will start with a bend in their knees so that they will initiate the Jump from a static position. Before jumping, the athlete should dip the same hand they used to measure their reach in water or chalk. They will then jump up and touch as high as they can on the wall, which will leave a mark with either chalk or water to indicate their touch. The height of their reach will then be subtracted from their touch to produce the vertical jump calculation.
The Counter Movement Jump
The Counter Movement Jump is very similar to the Sargent Jump, except that the athlete will begin the movement from a standing position before dynamically bending their knees and swinging their arms back before swinging their arms forward and upward as they jump up to reach as high as they can with their dominant arm. This type of vertical Jump will usually produce higher results than a Sargent Jump because it’s a dynamic start. However, because of the extra movement in preparation to jump it can require some timing, which can be improved with practice, which in turn may cause some improvements in performance to be influenced by skill acquisition rather than just improvements in leg power. I personally prefer to use the Counter Movement Jump because most athletes tend to use a Counter Movement naturally when doing a vertical jump.
Often times athletes will have to work very hard not to automatically go into a counter movement jump when asking them to do a more static start as you see in the Sargent Jump, so it seems to be a much more natural way of testing compared with the stricter Sargent Jump.
The Implication of the Vertical Jump Results
There are a few things to note when trying to gain information on training from vertical jump tests. The first is that the type of jumping ability an athlete exhibits can be based on the types of sports they participate in. In sports such as the throwing events in track and field, Olympic weight lifting, or blocking in volleyball, a lot of the force that is generated during the course of these movements is generated vertically in a confined space. In this situation, these types of movements align well with a double-legged vertical jump test, and one would think that the more successful athletes in these sports would have better vertical jumps from a standing position. Conversely, athletes in sports such as basketball or the High Jump or Long Jump in track and field, which involve a lot of horizontal movement, may have better jumps off of one leg since the majority of jumping is off of one leg in these sports. In this case, a vertical jump test that sees one take off with one leg with a three-step approach may be a more applicable test of their specific jumping ability.
To give a real-life example of this situation, I can relate to you the story about an NCAA-level female javelin thrower that I coached who was a former basketball player in community college. We tested her countermovement jump, and it consistently came in at 19,” which appeared to be very low, especially when I had similarly talented javelin throwers who routinely performed Counter Movement Jumps between 23″-25″. I figured with her basketball background that she would be a good jumper, but the results seemed to indicate otherwise. I then had her do a three-step single leg jump test, and she immediately registered a vertical jump of 27″. This was a classic example of an athlete being good at one type of test but not being very good at another version of the test because of her past athletic background, which had a large influence on the type of movements she was good at.
What is a Good Vertical Jump?
Vertical jumps will change over time, and they can be improved with proper training. It is very common for athletes who are tested for the vertical Jump to ask if they have done well or not. The following are some data for vertical jumps tests based on different populations:
For the general population, this table gives an idea of the different classifications of vertical jump performance:
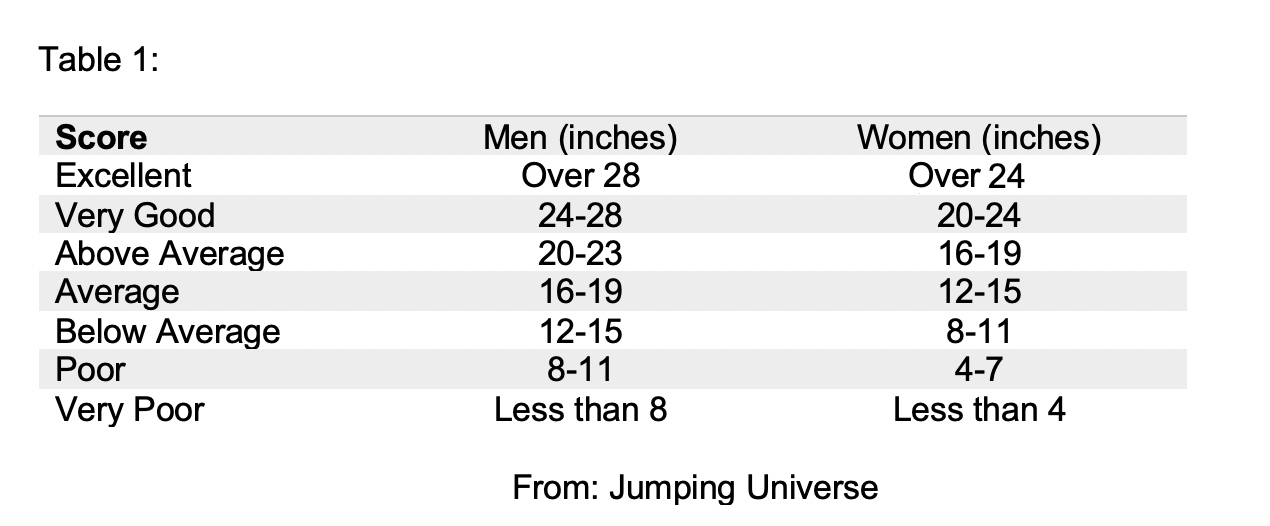
Score
Men (inches) / Women (inches)
Excellent
- Over 28
- Over 24
Very Good
- 24-28
- 20-24
Above Average
- 20-23
- 16-19
Average
- 16-19
- 12-15
Below Average
- 12-15
- 8-11
Poor
- 8-11
- 4-7
Very Poor
- Less than 8
- Less than 4
From: Jumping Universe
The next table provides an example of data for NCAA Division I football players:

Position
Sample size / Vertical Jump (cm)
Quarterback
- 26
- 80.7 ± 6.4
Running Back
- 50
- 85.9 ± 7.7
Wide Receiver
- 48
- 87.4 ± 7.0
Offensive Lineman
- 124
- 68.8 ± 6.2
Tight End
- 26
- 79.6 ± 7.2
Defensive Lineman
- 101
- 77.9 ± 8.2
Linebacker
- 75
- 83.2 ± 7.8
Defensive Back
- 99
- 87.8 ± 7.8
From: Garstecki, MA, Latin, RW, & Cuppertt, MM, (2004). Comparison of selected physical fitness and performance variables between NCAA Division I and Division II football players, Journal of Strength and Conditioning Research, 18, 292-297.
The Abalakov Test
The Abalakov Jump Test for power can be adapted to measure the athletes’ jumping ability while having to work against increased resistance. This is a more comprehensive and advanced test that can be done by taking multiple jump readings while adding different percentages of resistance to the athlete when they jump. The simplest way to do this is to add weight to the athlete by having them wear a weight vest when they are testing.
To perform this test, the athlete will perform two jumps at bodyweight (with no vest), with the best result being the one that counts. They will then repeat two jumps, each with 5%, 10%, 15%, and 20% of their body weight added to them via a weight vest. This will give the athlete five different vertical jump readings. This data from each of the five jumps can be plotted on a graph to give a visual idea of how much the athletes’ vertical Jump will decrease as they progressively add more weight to the vest (see Figure 1). If the slope of the line decreases steeply, then it is an indication that the athlete still has a lot of room for improvement in their power training (see Athletes B & D). If the slope of the line stays relatively flat, then it is an indication that the athlete is pretty well conditioned for power training and may not have as much room for improvement (see Athletes A & C) as one can see, this test does take a bit of time, so it is a type of test that you would do once every two to three months.

When to do Vertical Jump Tests
A few important points to remember when administering vertical jumps are that in order for the tests to be reliable, you must give the tests at the same points in training to be consistent. These testing times are usually at the end of a training block with enough recovery time put in in order to see if improvements have been made. If test results do not improve from previous tests, it can be an indication that training has been too hard and that more recovery and a program adjustment is needed.
RECOMMENDED FOR YOU


MOST POPULAR


The Vertical Jump and It’s Variations
The vertical Jump is a versatile field test that can be used in a wide variety of ways to measure performance. One of the key aspects of vertical jump tests that makes them so valuable is that they are easy to perform and need only a small amount of equipment to be administered. Because of its simplicity and the need for little in the way of technique, it can be a very reliable test. The main reasons for utilizing vertical jump tests are to determine general leg power and to check for nervous system fatigue due to overtraining. However, within this simple test, there are a wide variety of variations that can be used depending on the given situation.
How to Do the Sargent Jump
The Sargent Jump, which dates back to 1921, is the most basic form of the vertical jump test. When doing this jump test with the minimal amount of equipment, the athlete will begin by reaching up as high as they can against a wall with their dominant hand and mark how high they can reach. This measurement will be noted and used later on with the athlete’s “touch” measurement, which will be generated with the actual jump test. It is very important that the athlete reaches full extension doing the measurement and does this every time they are measured so the results will be consistent. This measurement can be the biggest source of error in the test if not done properly or consistently.
To begin the Sargent Jump, the athlete will start with a bend in their knees so that they will initiate the Jump from a static position. Before jumping, the athlete should dip the same hand they used to measure their reach in water or chalk. They will then jump up and touch as high as they can on the wall, which will leave a mark with either chalk or water to indicate their touch. The height of their reach will then be subtracted from their touch to produce the vertical jump calculation.
The Counter Movement Jump
The Counter Movement Jump is very similar to the Sargent Jump, except that the athlete will begin the movement from a standing position before dynamically bending their knees and swinging their arms back before swinging their arms forward and upward as they jump up to reach as high as they can with their dominant arm. This type of vertical Jump will usually produce higher results than a Sargent Jump because it’s a dynamic start. However, because of the extra movement in preparation to jump it can require some timing, which can be improved with practice, which in turn may cause some improvements in performance to be influenced by skill acquisition rather than just improvements in leg power. I personally prefer to use the Counter Movement Jump because most athletes tend to use a Counter Movement naturally when doing a vertical jump.
Often times athletes will have to work very hard not to automatically go into a counter movement jump when asking them to do a more static start as you see in the Sargent Jump, so it seems to be a much more natural way of testing compared with the stricter Sargent Jump.
The Implication of the Vertical Jump Results
There are a few things to note when trying to gain information on training from vertical jump tests. The first is that the type of jumping ability an athlete exhibits can be based on the types of sports they participate in. In sports such as the throwing events in track and field, Olympic weight lifting, or blocking in volleyball, a lot of the force that is generated during the course of these movements is generated vertically in a confined space. In this situation, these types of movements align well with a double-legged vertical jump test, and one would think that the more successful athletes in these sports would have better vertical jumps from a standing position. Conversely, athletes in sports such as basketball or the High Jump or Long Jump in track and field, which involve a lot of horizontal movement, may have better jumps off of one leg since the majority of jumping is off of one leg in these sports. In this case, a vertical jump test that sees one take off with one leg with a three-step approach may be a more applicable test of their specific jumping ability.
To give a real-life example of this situation, I can relate to you the story about an NCAA-level female javelin thrower that I coached who was a former basketball player in community college. We tested her countermovement jump, and it consistently came in at 19,” which appeared to be very low, especially when I had similarly talented javelin throwers who routinely performed Counter Movement Jumps between 23″-25″. I figured with her basketball background that she would be a good jumper, but the results seemed to indicate otherwise. I then had her do a three-step single leg jump test, and she immediately registered a vertical jump of 27″. This was a classic example of an athlete being good at one type of test but not being very good at another version of the test because of her past athletic background, which had a large influence on the type of movements she was good at.
What is a Good Vertical Jump?
Vertical jumps will change over time, and they can be improved with proper training. It is very common for athletes who are tested for the vertical Jump to ask if they have done well or not. The following are some data for vertical jumps tests based on different populations:
For the general population, this table gives an idea of the different classifications of vertical jump performance:
Score
Men (inches) / Women (inches)
Excellent
- Over 28
- Over 24
Very Good
- 24-28
- 20-24
Above Average
- 20-23
- 16-19
Average
- 16-19
- 12-15
Below Average
- 12-15
- 8-11
Poor
- 8-11
- 4-7
Very Poor
- Less than 8
- Less than 4
From: Jumping Universe
The next table provides an example of data for NCAA Division I football players:
Position
Sample size / Vertical Jump (cm)
Quarterback
- 26
- 80.7 ± 6.4
Running Back
- 50
- 85.9 ± 7.7
Wide Receiver
- 48
- 87.4 ± 7.0
Offensive Lineman
- 124
- 68.8 ± 6.2
Tight End
- 26
- 79.6 ± 7.2
Defensive Lineman
- 101
- 77.9 ± 8.2
Linebacker
- 75
- 83.2 ± 7.8
Defensive Back
- 99
- 87.8 ± 7.8
From: Garstecki, MA, Latin, RW, & Cuppertt, MM, (2004). Comparison of selected physical fitness and performance variables between NCAA Division I and Division II football players, Journal of Strength and Conditioning Research, 18, 292-297.
The Abalakov Test
The Abalakov Jump Test for power can be adapted to measure the athletes’ jumping ability while having to work against increased resistance. This is a more comprehensive and advanced test that can be done by taking multiple jump readings while adding different percentages of resistance to the athlete when they jump. The simplest way to do this is to add weight to the athlete by having them wear a weight vest when they are testing.
To perform this test, the athlete will perform two jumps at bodyweight (with no vest), with the best result being the one that counts. They will then repeat two jumps, each with 5%, 10%, 15%, and 20% of their body weight added to them via a weight vest. This will give the athlete five different vertical jump readings. This data from each of the five jumps can be plotted on a graph to give a visual idea of how much the athletes’ vertical Jump will decrease as they progressively add more weight to the vest (see Figure 1). If the slope of the line decreases steeply, then it is an indication that the athlete still has a lot of room for improvement in their power training (see Athletes B & D). If the slope of the line stays relatively flat, then it is an indication that the athlete is pretty well conditioned for power training and may not have as much room for improvement (see Athletes A & C) as one can see, this test does take a bit of time, so it is a type of test that you would do once every two to three months.
When to do Vertical Jump Tests
A few important points to remember when administering vertical jumps are that in order for the tests to be reliable, you must give the tests at the same points in training to be consistent. These testing times are usually at the end of a training block with enough recovery time put in in order to see if improvements have been made. If test results do not improve from previous tests, it can be an indication that training has been too hard and that more recovery and a program adjustment is needed.