Why ‘Anti’ Movements Are an Athlete’s Key to Functional Core Strength
Functional core strength.
It’s one of the most debated topics in fitness and athletic performance. In the context of athletics, “functional” means helpful in performing the movements and tasks required during live competition. While moving a bunch of plates on a Weighted Crunch machine does require a certain brand of core strength, it doesn’t really translate to better sports performance—therefore, it’s not functional.
But what is? As our understanding of the true role of our core musculature has increased, it’s become clear that “anti” movements are the key to building functional athletic core strength.
What Are ‘Anti’ Core Movements?
Traditional core exercises such as Sit-Ups, Crunches, Side Bends and Russian Twists all focus on creating motion through the core. During these movements, the spine flexes, extends, bends and rotates.
On the other end of the core training spectrum are anti-movements. As the name implies, anti-movements focus on preventing motion at the hips and spine. Research has found that the natural role of our core is to resist movement, not create it, so true functional exercises must focus on this ability. Mastering anti-movements help athletes stabilize the hips and spine during movement, resulting in a solid base of which to perform. This means a greater ability to transfer energy from the lower body to the upper body, and vice versa. The ability to efficiently transfer force between the lower and upper bodies will not only allow an athlete to produce more powerful and efficient actions during common movements like running, jumping, throwing, shooting, etc., but it will also make them more resilient to injury.
When athletes can not complete powerful actions without excess movement at the hips and spine, force is “leaked” out of the core instead of being transferred and optimally applied to produce the desired movement. Lost force means less explosive, less efficient movements—slower sprints, sloppier changes of direction, weaker pushes and pulls, etc.
A core incapable of resisting force can also create wear and tear on your joints, particularly in your hips and lower back. An unstable core can also result in poor movement patterns both up and down the chain, leading to issues in your knees, ankles, shoulders and elbows. In summation, a core capable of resisting force in a variety of planes helps an athlete move better and stay healthier.
The Three Types Of Anti-Core Exercises
The core anti-movements can generally be grouped into one of three categories—anti-extension, anti-rotation and anti-lateral flexion. Certain exercises may fall into two of these categories simultaneously. Let’s dive into each of these categories and explain their role in building a bulletproof athletic core.
1. Anti-Extension Exercises

In this case, extension refers to the spine. Extension of the spine occurs when the spine “extends” backwards, or when the back arches. This is also often accompanied by the hips coming forward, or if you’re training in the sagittal plane, “dropping” toward the ground.
Some extension of the spine will naturally occur when you are sprinting, throwing, shooting, etc., at high speeds. But an issue arises when there’s too much extension at the spine during these movements.
To prevent excess extension, we utilize anti-extension core movements. These include exercises like Dead Bugs, Planks, Ab Rollouts and Body Saws. The following exercises are listed in order of difficulty, and the goal of each is to prevent the back from overarching and the hips from tipping forward.
The Dead Bug
The Dead Bug is the foundational exercise that allows athletes to understand what it means to prevent extension of the lumbar spine.
To execute the Dead Bug, lie on your back and bring your hips and knees to 90 degrees. Raise your arms straight up toward the ceiling, keeping your wrist in line with your shoulders. Before you initiate any movement from this position, focus on keeping your back flat to the floor and preventing your ribcage from popping up. Envision pulling your zipper up toward your ribcage and “shrink wrapping” your spine with your abs.
Without allowing your back to arch or ribs to pop up, take a breath in and reach an arm and the opposite leg out, leaving the other arm and leg in the start position. Reach them out as far as you can without your low back coming off the floor. Breathe all of your air out at the end range, still focusing on keeping the back flat to the floor and preventing the ribs from popping up. Return to the start position and repeat with the other arm and leg. Shoot for 5-8 reps per side.
The Plank
The classic Plank allows an athlete to learn how to develop more tension in the core to prevent extension. To perform the Plank properly, start with the forearms on the ground and your feet together. Bring your hips off the ground.
At the top of the Plank ,you need to again focus on not allowing your low back to arch or hips to sag as you envision pulling your zipper up towards your ribcage. Also, it is important to keep the upper back from collapsing. To prevent this from happening, keep your upper back “filled out” by focusing on pushing the floor away as much as possible through the forearms.
You can either go for a set time (such as 30-60 consecutive seconds), or a number of breaths. Either way, you should focus on completing full breaths throughout the entire exercise to ensure your core is creating the stability and not your diaphragm. Once you master the basic Plank, you have a bevy of variations at your disposal.
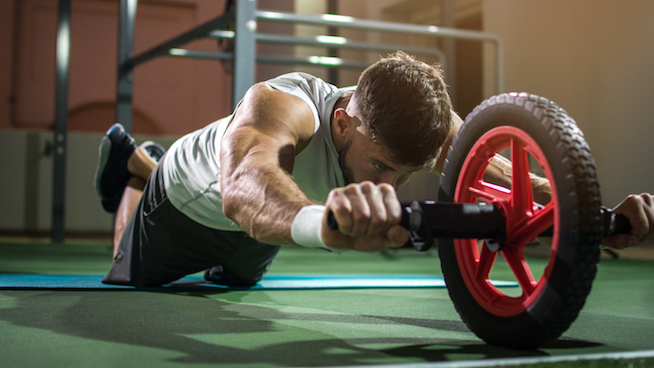
The Body Saw
The Body Saw is a dynamic plank variation. In mechanical terms, this exercise lengthens the lever that needs to be controlled, demanding greater ability to prevent extension.
Using a slideboard or a pair of slide disks on turf or carpet (or even a towel or t-shirt on a hardwood floor), start in a proper plank position as described above with your toes on the slide-able object(s).
From here, slide your body back and away from your forearms, going as far as you can before you feel your hips are in threat of dropping below the line of the heels and shoulders. Stop there and pull yourself back to the start position.
Like the Plank, you should focus on keeping your abs engaged (zipper up) the entire time to prevent extension. You should always feel like the work is taking place in your abs and not your low back. If you feel your low back, shorten the range of motion, and stay hyper focused on not allowing the hips to sag or the back to arch.
Go for 6-12 reps and make sure the movement is slow and controlled. Once you master the Body Saw, you can progress to an Ab Rollout.
2. Anti-Rotation Exercises
Anti-rotation exercises train the hips and spine to resist rotation.
Powerful rotation is a key athletic quality for many sports. To fully express rotational power, an athlete must first learn to control or prevent rotation. This will allow an athlete to fully harness the power they develop through the lower body and transfer it to the upper body without increasing their risk of injury.
The following exercises are listed in order of difficulty, with the goal of each to prevent rotation at the hips and low back.
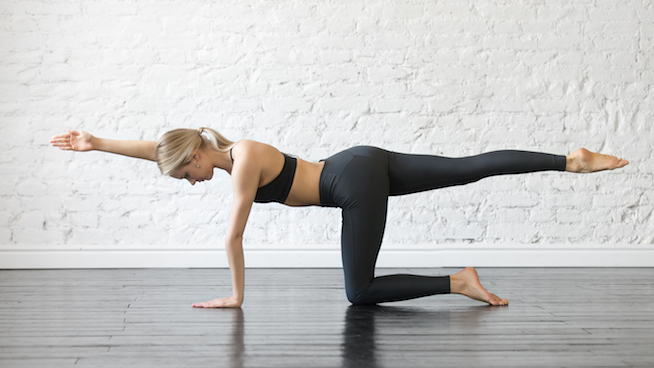
The Bird Dog
Like the Dead Bug, the Bird Dog is a foundational exercise. The ability to control rotation at the hip and low back when the arms and legs are moving is the first step to understanding and strengthening your ability to control rotation.
Start in a quadruped (all fours) position with your hands beneath your shoulders and your knees beneath your hips. Use your abs to find a neutral (“flat”) position at the low back and hips.
Keep the hip from shifting or rotating and the low back from arching as you reach the opposite hand and leg out. Envision getting as long as you can from your heel to your fingertips. Also, imagine a glass of water on your low back. Do not allow the glass of water to spill (if you truly want to try this, use an empty plastic cup).
Hold the end range of the movement for a 1-2 count and then return to the start position. Perform the same movement with the other arm and leg. Do not let the hips shift as you transition between sides. Alternate sides on each rep until you complete 6-8 reps per side.
Anti-Rotation Press (Pallof Press)
The name says it all here.
Start with a cable (or band) at belly button height. Stand sideways to the cable and bring the handle to the center of the chest.
Before pressing out, make sure you are in a solid athletic position with the abs engaged (as if you were to pull your zipper to your ribcage), feet hip width apart (or slightly wider), and your hips slightly hinged.
Press the cable straight out from your chest, never letting the cable deviate from a straight path. Hold the end range for a 1-2 count and slowly return the cable back to the chest. The entire time, the resistance from the cable is trying make you rotate at the hips and spine. You must fight against this and keep your hips and spine as square as possible!
You should feel the work taking place in the core, especially on the side closest to the cable anchor, where the obliques will be working to prevent the rotation. Go for 8-12 reps on each side.
Anti-Rotation Pulse
Like the Anti-Rotation Press, the Anti-Rotation Pulse uses a cable (or band) to create a rotational force that must be controlled. The difference here is that there will be a changing pulsing action that must be controlled, increasing the difficulty of the challenge.
Start in the same position as the anti-rotation press. Push the cable out from the chest, but this time, bring the cable in line with the inside shoulder. Without letting the hips or low back rotate, pulse the cable from your inside shoulder to the outside shoulder, always keeping the arms long.
The pulsing action can start off slow to ensure you can maintain your position. Once you are locked in, increase the speed of the pulse. Make sure to complete reps facing both directions, and to breathe during the exercise. Go for 15-25 reps per side. Once you’ve mastered this move in the bilateral position, you can try it in a split stance position. This further increases the challenge and places you in another functional sport position.
3. Anti-Lateral Flexion Exercises

During many change-of-direction actions in sport, the spine will want to bend to the side as the shoulders will want to sway outside of the hips. When this happens, not only will the athlete’s ability to quickly and efficiently change directions be drastically reduced, but they will also be placed at a higher risk for injury to the ankle, knee and hip.
To mitigate this, anti-lateral flexion exercises can be utilized to train the spine to resist bending to the side. The following exercises are listed in order of difficulty with the goal of each to help you solidify your ability to keep the spine from bending to the side.
The Side Plank
The Side Plank is the foundational exercise when it comes to strengthening anti-lateral flexion. The force that must be controlled is gravity, which is trying to pull the hips towards the floor. The hips sagging to the floor is the same flawed movement we would see when the spine bends to the side in an upright position.
To execute the Side Plank, lie on your side with your forearm on the ground directly beneath your shoulder and your feet stacked. Before your bring your hips off the ground, engage your abs as if you were to pull your zipper to your ribcage. Many times, athletes will overarch their back in the side plank which decreases the effectiveness of the exercise. Don’t let this happen!
Bridge your hips up from the ground, obtaining a straight line from the shoulders to the ankles. You should feel the work taking place in the underside of the core, particularly in your obliques. If you feel your low back is doing the brunt of the work, try rotating the top hip slightly forward to put the obliques in a better position to do the work for you.
Like the plank, you can go for time (30-60 consecutive seconds), or you can use a breath count (5-8 full breaths). Either way, make sure to breathe fully throughout the exercise, and then complete an equal set on the other side.
You can enhance the challenge of the Side Plank by removing the top leg and either marching the knee toward the chest or bringing the leg straight up towards the ceiling. Here you can go for 6-10 reps per side.
The Single-Arm Farmer’s Walk
The Single-Arm Farmers Walk allows the athlete to train and enhance their anti-lateral flexion ability from a standing position. The dumbbell (or other weight) is trying to pull the athlete into a side bend. Typically, the athlete will super compensate the movement and lean away from the dumbbell, creating a side bend to the opposite side. We do not want this either! We want you to stand and walk as naturally and as normally as possible, as if you didn’t even have a weight in your hand.
Start in a standing position with a heavy dumbbell in one hand. Keep the abs engaged and upper back tight (shoulder blades tipped back). Focus on keeping the body “tight and tall,” never allowing the torso to bend toward the dumbbell or lean away to the other side.
Take small and controlled steps, keeping the feet from crossing over each other as you walk forward. Go for time (30-60 seconds) or distance (20-100 yards), and then switch the dumbbell to the other hand and repeat. You should feel the work mostly taking place in the side of the core away from the dumbbell.
Suspension Anti-Lateral Flexion
With the use of a suspension trainer, you can create a unique demand on the core. Like in the Side Plank, Your body weight acts as your resistance. However, since you’re now on your feet, the lever you must control is longer, increasing the demand of the exercise.
Start parallel to a suspension trainer with your outside foot in front of your inside foot, but nearly equal in width. Grab the handle of the suspension trainer with both hands and bring it to the center of your chest. Lean away from the trainer, using the trainer to keep you from falling to the ground.
Without letting the hips sag toward the floor, push the handle of the suspension trainer overhead. Hold the end range for a 1-2 count and then return the handle to the chest. Repeat for 6-10 reps, and then turn around and complete reps facing the other direction.
Hopefully, this article has helped you understand why anti-movements are essential for building functional core strength and stability in athletes. If our core can resist certain movements during activity, we become more powerful, efficient creatures. While this article did not include every anti-movement available to you, these exercises are a great starting point for most athletes. By mastering these anti-movements, athletes will set themselves up for greater success in sport by mitigating injury risk and enhancing their ability to transfer force and create greater power.
Photo Credit: Cecilie_Arcurs/iStock, fizkes/iStock, PeopleImages/iStock, Bojan89/iStock
RECOMMENDED FOR YOU


Why ‘Anti’ Movements Are an Athlete’s Key to Functional Core Strength
Functional core strength.
It’s one of the most debated topics in fitness and athletic performance. In the context of athletics, “functional” means helpful in performing the movements and tasks required during live competition. While moving a bunch of plates on a Weighted Crunch machine does require a certain brand of core strength, it doesn’t really translate to better sports performance—therefore, it’s not functional.
But what is? As our understanding of the true role of our core musculature has increased, it’s become clear that “anti” movements are the key to building functional athletic core strength.
What Are ‘Anti’ Core Movements?
Traditional core exercises such as Sit-Ups, Crunches, Side Bends and Russian Twists all focus on creating motion through the core. During these movements, the spine flexes, extends, bends and rotates.
On the other end of the core training spectrum are anti-movements. As the name implies, anti-movements focus on preventing motion at the hips and spine. Research has found that the natural role of our core is to resist movement, not create it, so true functional exercises must focus on this ability. Mastering anti-movements help athletes stabilize the hips and spine during movement, resulting in a solid base of which to perform. This means a greater ability to transfer energy from the lower body to the upper body, and vice versa. The ability to efficiently transfer force between the lower and upper bodies will not only allow an athlete to produce more powerful and efficient actions during common movements like running, jumping, throwing, shooting, etc., but it will also make them more resilient to injury.
When athletes can not complete powerful actions without excess movement at the hips and spine, force is “leaked” out of the core instead of being transferred and optimally applied to produce the desired movement. Lost force means less explosive, less efficient movements—slower sprints, sloppier changes of direction, weaker pushes and pulls, etc.
A core incapable of resisting force can also create wear and tear on your joints, particularly in your hips and lower back. An unstable core can also result in poor movement patterns both up and down the chain, leading to issues in your knees, ankles, shoulders and elbows. In summation, a core capable of resisting force in a variety of planes helps an athlete move better and stay healthier.
The Three Types Of Anti-Core Exercises
The core anti-movements can generally be grouped into one of three categories—anti-extension, anti-rotation and anti-lateral flexion. Certain exercises may fall into two of these categories simultaneously. Let’s dive into each of these categories and explain their role in building a bulletproof athletic core.
1. Anti-Extension Exercises
In this case, extension refers to the spine. Extension of the spine occurs when the spine “extends” backwards, or when the back arches. This is also often accompanied by the hips coming forward, or if you’re training in the sagittal plane, “dropping” toward the ground.
Some extension of the spine will naturally occur when you are sprinting, throwing, shooting, etc., at high speeds. But an issue arises when there’s too much extension at the spine during these movements.
To prevent excess extension, we utilize anti-extension core movements. These include exercises like Dead Bugs, Planks, Ab Rollouts and Body Saws. The following exercises are listed in order of difficulty, and the goal of each is to prevent the back from overarching and the hips from tipping forward.
The Dead Bug
The Dead Bug is the foundational exercise that allows athletes to understand what it means to prevent extension of the lumbar spine.
To execute the Dead Bug, lie on your back and bring your hips and knees to 90 degrees. Raise your arms straight up toward the ceiling, keeping your wrist in line with your shoulders. Before you initiate any movement from this position, focus on keeping your back flat to the floor and preventing your ribcage from popping up. Envision pulling your zipper up toward your ribcage and “shrink wrapping” your spine with your abs.
Without allowing your back to arch or ribs to pop up, take a breath in and reach an arm and the opposite leg out, leaving the other arm and leg in the start position. Reach them out as far as you can without your low back coming off the floor. Breathe all of your air out at the end range, still focusing on keeping the back flat to the floor and preventing the ribs from popping up. Return to the start position and repeat with the other arm and leg. Shoot for 5-8 reps per side.
The Plank
The classic Plank allows an athlete to learn how to develop more tension in the core to prevent extension. To perform the Plank properly, start with the forearms on the ground and your feet together. Bring your hips off the ground.
At the top of the Plank ,you need to again focus on not allowing your low back to arch or hips to sag as you envision pulling your zipper up towards your ribcage. Also, it is important to keep the upper back from collapsing. To prevent this from happening, keep your upper back “filled out” by focusing on pushing the floor away as much as possible through the forearms.
You can either go for a set time (such as 30-60 consecutive seconds), or a number of breaths. Either way, you should focus on completing full breaths throughout the entire exercise to ensure your core is creating the stability and not your diaphragm. Once you master the basic Plank, you have a bevy of variations at your disposal.
The Body Saw
The Body Saw is a dynamic plank variation. In mechanical terms, this exercise lengthens the lever that needs to be controlled, demanding greater ability to prevent extension.
Using a slideboard or a pair of slide disks on turf or carpet (or even a towel or t-shirt on a hardwood floor), start in a proper plank position as described above with your toes on the slide-able object(s).
From here, slide your body back and away from your forearms, going as far as you can before you feel your hips are in threat of dropping below the line of the heels and shoulders. Stop there and pull yourself back to the start position.
Like the Plank, you should focus on keeping your abs engaged (zipper up) the entire time to prevent extension. You should always feel like the work is taking place in your abs and not your low back. If you feel your low back, shorten the range of motion, and stay hyper focused on not allowing the hips to sag or the back to arch.
Go for 6-12 reps and make sure the movement is slow and controlled. Once you master the Body Saw, you can progress to an Ab Rollout.
2. Anti-Rotation Exercises
Anti-rotation exercises train the hips and spine to resist rotation.
Powerful rotation is a key athletic quality for many sports. To fully express rotational power, an athlete must first learn to control or prevent rotation. This will allow an athlete to fully harness the power they develop through the lower body and transfer it to the upper body without increasing their risk of injury.
The following exercises are listed in order of difficulty, with the goal of each to prevent rotation at the hips and low back.
The Bird Dog
Like the Dead Bug, the Bird Dog is a foundational exercise. The ability to control rotation at the hip and low back when the arms and legs are moving is the first step to understanding and strengthening your ability to control rotation.
Start in a quadruped (all fours) position with your hands beneath your shoulders and your knees beneath your hips. Use your abs to find a neutral (“flat”) position at the low back and hips.
Keep the hip from shifting or rotating and the low back from arching as you reach the opposite hand and leg out. Envision getting as long as you can from your heel to your fingertips. Also, imagine a glass of water on your low back. Do not allow the glass of water to spill (if you truly want to try this, use an empty plastic cup).
Hold the end range of the movement for a 1-2 count and then return to the start position. Perform the same movement with the other arm and leg. Do not let the hips shift as you transition between sides. Alternate sides on each rep until you complete 6-8 reps per side.
Anti-Rotation Press (Pallof Press)
The name says it all here.
Start with a cable (or band) at belly button height. Stand sideways to the cable and bring the handle to the center of the chest.
Before pressing out, make sure you are in a solid athletic position with the abs engaged (as if you were to pull your zipper to your ribcage), feet hip width apart (or slightly wider), and your hips slightly hinged.
Press the cable straight out from your chest, never letting the cable deviate from a straight path. Hold the end range for a 1-2 count and slowly return the cable back to the chest. The entire time, the resistance from the cable is trying make you rotate at the hips and spine. You must fight against this and keep your hips and spine as square as possible!
You should feel the work taking place in the core, especially on the side closest to the cable anchor, where the obliques will be working to prevent the rotation. Go for 8-12 reps on each side.
Anti-Rotation Pulse
Like the Anti-Rotation Press, the Anti-Rotation Pulse uses a cable (or band) to create a rotational force that must be controlled. The difference here is that there will be a changing pulsing action that must be controlled, increasing the difficulty of the challenge.
Start in the same position as the anti-rotation press. Push the cable out from the chest, but this time, bring the cable in line with the inside shoulder. Without letting the hips or low back rotate, pulse the cable from your inside shoulder to the outside shoulder, always keeping the arms long.
The pulsing action can start off slow to ensure you can maintain your position. Once you are locked in, increase the speed of the pulse. Make sure to complete reps facing both directions, and to breathe during the exercise. Go for 15-25 reps per side. Once you’ve mastered this move in the bilateral position, you can try it in a split stance position. This further increases the challenge and places you in another functional sport position.
3. Anti-Lateral Flexion Exercises
During many change-of-direction actions in sport, the spine will want to bend to the side as the shoulders will want to sway outside of the hips. When this happens, not only will the athlete’s ability to quickly and efficiently change directions be drastically reduced, but they will also be placed at a higher risk for injury to the ankle, knee and hip.
To mitigate this, anti-lateral flexion exercises can be utilized to train the spine to resist bending to the side. The following exercises are listed in order of difficulty with the goal of each to help you solidify your ability to keep the spine from bending to the side.
The Side Plank
The Side Plank is the foundational exercise when it comes to strengthening anti-lateral flexion. The force that must be controlled is gravity, which is trying to pull the hips towards the floor. The hips sagging to the floor is the same flawed movement we would see when the spine bends to the side in an upright position.
To execute the Side Plank, lie on your side with your forearm on the ground directly beneath your shoulder and your feet stacked. Before your bring your hips off the ground, engage your abs as if you were to pull your zipper to your ribcage. Many times, athletes will overarch their back in the side plank which decreases the effectiveness of the exercise. Don’t let this happen!
Bridge your hips up from the ground, obtaining a straight line from the shoulders to the ankles. You should feel the work taking place in the underside of the core, particularly in your obliques. If you feel your low back is doing the brunt of the work, try rotating the top hip slightly forward to put the obliques in a better position to do the work for you.
Like the plank, you can go for time (30-60 consecutive seconds), or you can use a breath count (5-8 full breaths). Either way, make sure to breathe fully throughout the exercise, and then complete an equal set on the other side.
You can enhance the challenge of the Side Plank by removing the top leg and either marching the knee toward the chest or bringing the leg straight up towards the ceiling. Here you can go for 6-10 reps per side.
The Single-Arm Farmer’s Walk
The Single-Arm Farmers Walk allows the athlete to train and enhance their anti-lateral flexion ability from a standing position. The dumbbell (or other weight) is trying to pull the athlete into a side bend. Typically, the athlete will super compensate the movement and lean away from the dumbbell, creating a side bend to the opposite side. We do not want this either! We want you to stand and walk as naturally and as normally as possible, as if you didn’t even have a weight in your hand.
Start in a standing position with a heavy dumbbell in one hand. Keep the abs engaged and upper back tight (shoulder blades tipped back). Focus on keeping the body “tight and tall,” never allowing the torso to bend toward the dumbbell or lean away to the other side.
Take small and controlled steps, keeping the feet from crossing over each other as you walk forward. Go for time (30-60 seconds) or distance (20-100 yards), and then switch the dumbbell to the other hand and repeat. You should feel the work mostly taking place in the side of the core away from the dumbbell.
Suspension Anti-Lateral Flexion
With the use of a suspension trainer, you can create a unique demand on the core. Like in the Side Plank, Your body weight acts as your resistance. However, since you’re now on your feet, the lever you must control is longer, increasing the demand of the exercise.
Start parallel to a suspension trainer with your outside foot in front of your inside foot, but nearly equal in width. Grab the handle of the suspension trainer with both hands and bring it to the center of your chest. Lean away from the trainer, using the trainer to keep you from falling to the ground.
Without letting the hips sag toward the floor, push the handle of the suspension trainer overhead. Hold the end range for a 1-2 count and then return the handle to the chest. Repeat for 6-10 reps, and then turn around and complete reps facing the other direction.
Hopefully, this article has helped you understand why anti-movements are essential for building functional core strength and stability in athletes. If our core can resist certain movements during activity, we become more powerful, efficient creatures. While this article did not include every anti-movement available to you, these exercises are a great starting point for most athletes. By mastering these anti-movements, athletes will set themselves up for greater success in sport by mitigating injury risk and enhancing their ability to transfer force and create greater power.
Photo Credit: Cecilie_Arcurs/iStock, fizkes/iStock, PeopleImages/iStock, Bojan89/iStock