Fix Your Posture With This Exercise
This hip hinge is a pattern we all use; if you’re sitting down reading this, you’re currently in a “passive” hip hinge position. Now that I’ve made you aware of your seated position, I suspect you might be altering your posture, straightening your spine, and shifting to the edge of your chair to get into a good body position. If you’ve done this, you have an awareness of spine positioning rules.
RELATED: Are Tight Hips Slowing You Down?
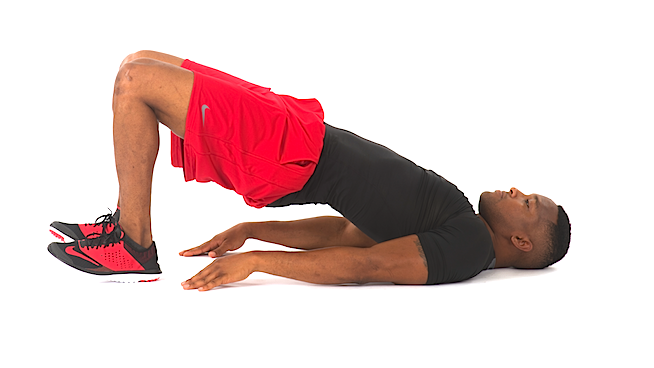
Segmented Hip Bridge
The Segmented Hip Bridge can be modified for anyone. I don’t want to make it sound like the greatest tool to encourage hip flexion/extension range of motion since the Lazy Boy chair. But it will prepare your joints for function, whereas the Lazy Boy will prepare you for dysfunction!
RELATED: Build Explosive Hips to Jump Higher
If you do it correctly, you will feel each spinal segment ascend and descend, similar to how an escalator controls one step at a time. With proper positioning and weight distribution of the feet, you can truly feel your medial hamstrings (semimembranosus and tendinosis) pull their weight, challenging your gluteus maximus to fire more efficiently. On the other side of your thigh, the hip flexors experience a stretch-contraction tension, as do the rectus femoris and its little friend the psoas. (The psoas is a beautiful muscle with many roles, one of which is to flex the hip, another being to stabilize the core.).
The goal is to prime the spine and all the muscles around it that aid in flexion, extension and neutrality before you perform a neutral isometric bridge. Don’t be deceived by its simplicity. The ability to control the ascent and descent of the spine and pelvis without dropping the back or hips on the floor at once in an uncontrolled fashion is harder than you think.
The Hip Bridge raises kinesthetic awareness and motor control, serving as an effective tool for athletes or desk jockeys, challenging their ability to slow down and own every bit of their spinal movement. If this is lacking, how can we expect someone to truly feel and place their body in a neutral spine? If you have a neutral spine without appreciating anything besides that, how will you adapt in a real life situation when you shift out of neutral and have to find your way back?
How can we train the athletic hip to generate power?
Hip Bridge benefits
-
Simple: you’re lying on the floor! The floor gives you proprioceptive feedback, unlike performance of a segmented cat-camel.
-
Transferable: good foundation on which to build other hip-dominant movements.
Common Hip Bridge errors
- Flaring out of the knees
- Supinated feet (the outside or lateral part of the foot creates most of the force)
- People rush through the movement and no longer engage their muscles in a fashion that could lead to a transferable adaptation in their arena, whether it’s around the house or in a hip-dominant exercise such as the Deadlift.
Keep your knees hip-width apart and your feet flat on the floor. Slow down, feel the movement and breathe.
Note: special credit to a past professor and friend, Dr. DeCicco, who introduced me to this movement both verbally and visually.
RECOMMENDED FOR YOU
MOST POPULAR
Fix Your Posture With This Exercise
This hip hinge is a pattern we all use; if you’re sitting down reading this, you’re currently in a “passive” hip hinge position. Now that I’ve made you aware of your seated position, I suspect you might be altering your posture, straightening your spine, and shifting to the edge of your chair to get into a good body position. If you’ve done this, you have an awareness of spine positioning rules.
RELATED: Are Tight Hips Slowing You Down?
Segmented Hip Bridge
The Segmented Hip Bridge can be modified for anyone. I don’t want to make it sound like the greatest tool to encourage hip flexion/extension range of motion since the Lazy Boy chair. But it will prepare your joints for function, whereas the Lazy Boy will prepare you for dysfunction!
RELATED: Build Explosive Hips to Jump Higher
If you do it correctly, you will feel each spinal segment ascend and descend, similar to how an escalator controls one step at a time. With proper positioning and weight distribution of the feet, you can truly feel your medial hamstrings (semimembranosus and tendinosis) pull their weight, challenging your gluteus maximus to fire more efficiently. On the other side of your thigh, the hip flexors experience a stretch-contraction tension, as do the rectus femoris and its little friend the psoas. (The psoas is a beautiful muscle with many roles, one of which is to flex the hip, another being to stabilize the core.).
The goal is to prime the spine and all the muscles around it that aid in flexion, extension and neutrality before you perform a neutral isometric bridge. Don’t be deceived by its simplicity. The ability to control the ascent and descent of the spine and pelvis without dropping the back or hips on the floor at once in an uncontrolled fashion is harder than you think.
The Hip Bridge raises kinesthetic awareness and motor control, serving as an effective tool for athletes or desk jockeys, challenging their ability to slow down and own every bit of their spinal movement. If this is lacking, how can we expect someone to truly feel and place their body in a neutral spine? If you have a neutral spine without appreciating anything besides that, how will you adapt in a real life situation when you shift out of neutral and have to find your way back?
How can we train the athletic hip to generate power?

Hip Bridge benefits
-
Simple: you’re lying on the floor! The floor gives you proprioceptive feedback, unlike performance of a segmented cat-camel.
-
Transferable: good foundation on which to build other hip-dominant movements.
Common Hip Bridge errors
- Flaring out of the knees
- Supinated feet (the outside or lateral part of the foot creates most of the force)
- People rush through the movement and no longer engage their muscles in a fashion that could lead to a transferable adaptation in their arena, whether it’s around the house or in a hip-dominant exercise such as the Deadlift.
Keep your knees hip-width apart and your feet flat on the floor. Slow down, feel the movement and breathe.
Note: special credit to a past professor and friend, Dr. DeCicco, who introduced me to this movement both verbally and visually.

