Learn Basketball Layups, Part 2: The Underhand Layup
In our second installment of the “How to Master Basketball Layups” series, we focus on the “true” layup or, as it’s better known, the underhand layup. It’s nicknamed the “true layup” because when you do it correctly, you actually lay the ball up to the backboard. Because it’s a misunderstood layup, it’s less often taught by coaches.
Although the overhead layup is easier to learn and score with, the underhand layup is often required in fast moving games. It is an essential skill for basketball players to master, because nearly all of the other types of layups you’ll learn in this series utilize an underhand motion.
Underhand Layup
- Up until the actual release of the ball, your footwork and approach is the same as for the overhand layup.
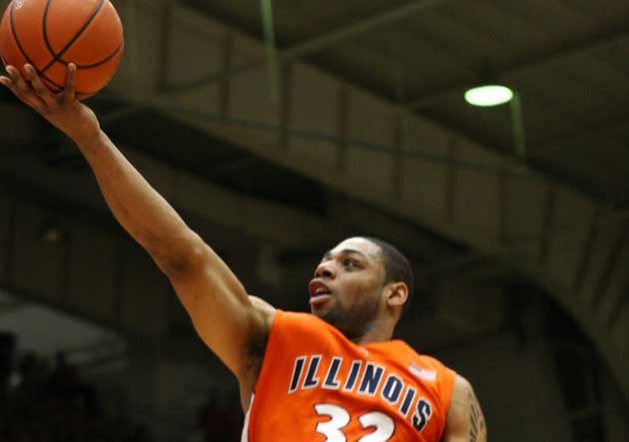
- As with any layup, the ball starts at the chest. Then, as you elevate, you lift the ball by keeping your hand under it, palm up. Your fingers should be closer to the basket, and your wrist should be slightly bent backward.
- As you extend your arm up, give a slight flick of your wrist toward the basket.
- Your follow through should be reaching toward the rim, slightly across your body, no more than past your face.
- This looks like a finger roll, but they are different things. The lift on the ball comes from your legs as you jump and from the full extension of your arm—not from flinging it up with your arm. The ball should go up softly and hit the top corner of the square before dropping into the basket.
The underhand layup is best used when you are attacking at a fast pace and cannot slow down to shoot in a more fluid motion from a good angle. The release angle is better than it would be if you were almost under the basket; and the softer touch you get from the lift of the ball (as opposed to the push of the ball in an overhand layup) makes it easier to score at faster speeds. Most players miss an underhand layup because they try to shoot with one hand without slapping the ball to get a better handle on it. This makes them take their eyes off the top corner of the box, start the shooting motion below their chest, or rock the ball to the side before shooting. (See also (Five Training Keys to Getting Quicker for Basketball) and Point Guard Drills for Ball Handling and Court Vision.)
Drills to Practice the Underhand Layup
Perfecting the underhand layup and developing proper footwork are the same as with the overhand layup. The following drills build on that progress at a faster speed to make the underhand layup more comfortable.
Three steps, one dribble, going faster:
- Start on the right elbow facing the baseline in a triple threat position with the ball on your right hip.
- Aim for the top corner of the box.
- Step with your left foot and dribble hard with your right hand.
- Step with your right foot and continue with the layup (as described above).
Four steps, two dribbles, from the wing:
- Start on the right wing (3-point line or free throw line extended) facing the basket in a triple threat position with the ball on your right hip.
- Aim for the top corner of the box.
- Step with your right foot and dribble hard with your right hand.
- Step with your left foot and dribble hard with your right hand.
- Step with your right foot again and continue with the layup (as described above)
Three steps, two dribbles, going faster from the wing:
- Start on the right wing (3-point line or free throw line extended), facing the basket in a triple threat position with the ball on your right hip.
- Aim for the top corner of the box
- Step with your left foot and dribble hard with your right hand.
- Step with your right foot and continue with the layup (as described above)
Attacking from half court:
- Start at half court on the right sideline facing the basket in a triple threat position with the ball on your right hip.
- Aim for the top corner of the box.
- Take more dribbles. It will be harder to keep your head up and not look down, but it gets easier as your ball handling improves.
- Dribble toward the basket with your right hand.
- When you are between the first and second hash marks, scoop the ball up and as your right foot hits the ground, slap the ball.
- Remember, your angle to the basket is different, and you will be on the right of the side of the key.
- Continue shooting as before, jumping off your left foot.
Read More
This is just one installment from our “How to Master Basketball Layups” series, which includes other guides to help you with…
- (Part 1) The Overhand Layup
- (Part 2) The Underhand Layup
- (Part 3) The Power Layup
- (Part 4) The Backhand Layup
- (Part 5) The Middle Reverse Layup
- (Part 6) The Backhand Reverse Layup
- (Part 7) Advanced Finishing Moves
RECOMMENDED FOR YOU
MOST POPULAR
Learn Basketball Layups, Part 2: The Underhand Layup
In our second installment of the “How to Master Basketball Layups” series, we focus on the “true” layup or, as it’s better known, the underhand layup. It’s nicknamed the “true layup” because when you do it correctly, you actually lay the ball up to the backboard. Because it’s a misunderstood layup, it’s less often taught by coaches.
Although the overhead layup is easier to learn and score with, the underhand layup is often required in fast moving games. It is an essential skill for basketball players to master, because nearly all of the other types of layups you’ll learn in this series utilize an underhand motion.
Underhand Layup
- Up until the actual release of the ball, your footwork and approach is the same as for the overhand layup.
- As with any layup, the ball starts at the chest. Then, as you elevate, you lift the ball by keeping your hand under it, palm up. Your fingers should be closer to the basket, and your wrist should be slightly bent backward.
- As you extend your arm up, give a slight flick of your wrist toward the basket.
- Your follow through should be reaching toward the rim, slightly across your body, no more than past your face.
- This looks like a finger roll, but they are different things. The lift on the ball comes from your legs as you jump and from the full extension of your arm—not from flinging it up with your arm. The ball should go up softly and hit the top corner of the square before dropping into the basket.
The underhand layup is best used when you are attacking at a fast pace and cannot slow down to shoot in a more fluid motion from a good angle. The release angle is better than it would be if you were almost under the basket; and the softer touch you get from the lift of the ball (as opposed to the push of the ball in an overhand layup) makes it easier to score at faster speeds. Most players miss an underhand layup because they try to shoot with one hand without slapping the ball to get a better handle on it. This makes them take their eyes off the top corner of the box, start the shooting motion below their chest, or rock the ball to the side before shooting. (See also (Five Training Keys to Getting Quicker for Basketball) and Point Guard Drills for Ball Handling and Court Vision.)
Drills to Practice the Underhand Layup
Perfecting the underhand layup and developing proper footwork are the same as with the overhand layup. The following drills build on that progress at a faster speed to make the underhand layup more comfortable.
Three steps, one dribble, going faster:
- Start on the right elbow facing the baseline in a triple threat position with the ball on your right hip.
- Aim for the top corner of the box.
- Step with your left foot and dribble hard with your right hand.
- Step with your right foot and continue with the layup (as described above).
Four steps, two dribbles, from the wing:
- Start on the right wing (3-point line or free throw line extended) facing the basket in a triple threat position with the ball on your right hip.
- Aim for the top corner of the box.
- Step with your right foot and dribble hard with your right hand.
- Step with your left foot and dribble hard with your right hand.
- Step with your right foot again and continue with the layup (as described above)
Three steps, two dribbles, going faster from the wing:
- Start on the right wing (3-point line or free throw line extended), facing the basket in a triple threat position with the ball on your right hip.
- Aim for the top corner of the box
- Step with your left foot and dribble hard with your right hand.
- Step with your right foot and continue with the layup (as described above)
Attacking from half court:
- Start at half court on the right sideline facing the basket in a triple threat position with the ball on your right hip.
- Aim for the top corner of the box.
- Take more dribbles. It will be harder to keep your head up and not look down, but it gets easier as your ball handling improves.
- Dribble toward the basket with your right hand.
- When you are between the first and second hash marks, scoop the ball up and as your right foot hits the ground, slap the ball.
- Remember, your angle to the basket is different, and you will be on the right of the side of the key.
- Continue shooting as before, jumping off your left foot.
Read More
This is just one installment from our “How to Master Basketball Layups” series, which includes other guides to help you with…
- (Part 1) The Overhand Layup
- (Part 2) The Underhand Layup
- (Part 3) The Power Layup
- (Part 4) The Backhand Layup
- (Part 5) The Middle Reverse Layup
- (Part 6) The Backhand Reverse Layup
- (Part 7) Advanced Finishing Moves

